Meats and Sausages

Ives-Way 603 Can Sealer
Model 603 can sealer is designed for sealing dry goods or gift items in large cans:
- No. 10 - 603 x 700, 109 oz
- No. 12 - 603 x 812, 138 oz
You must not seal low acid foods such as meat, poultry, fish and vegetables in such large cans.
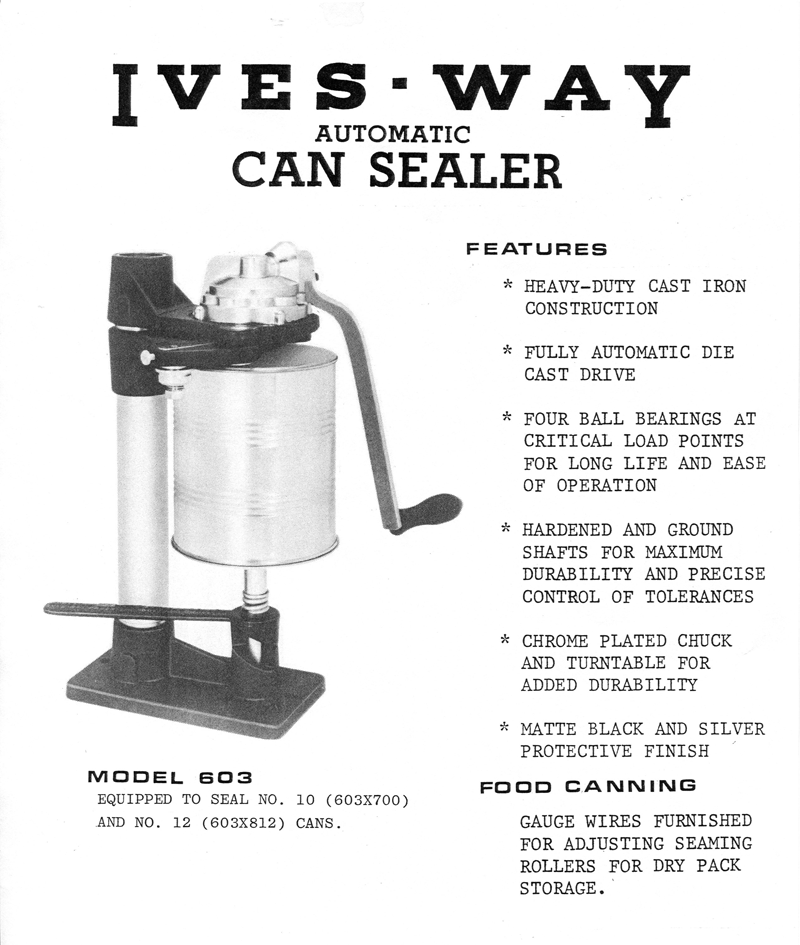
Model 603 can sealer.
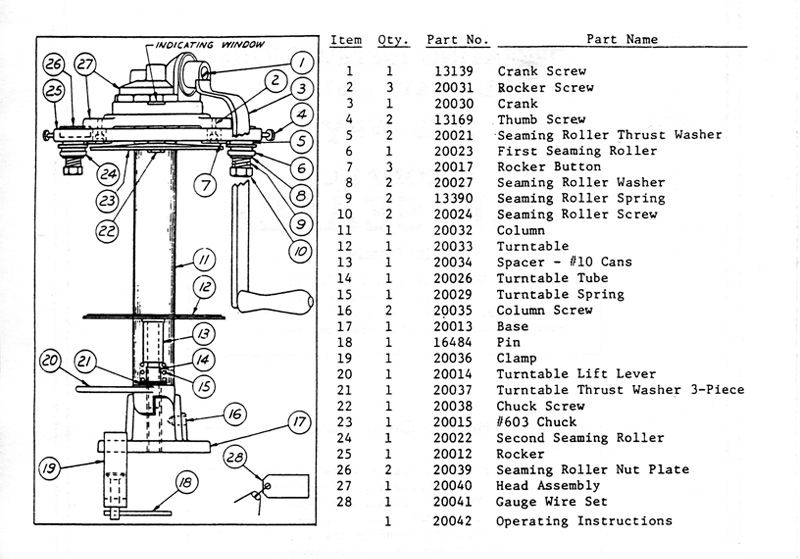
Model 603 can sealer part list.
Setting Up
Fasten sealer to bench or table with clamp (Item 19) using pin (Item 18) to tighten clamp screw. Bolt holes are furnished at front and rear of base for permanent mounting (bolts not furnished). To attach the crank, turn the chuck (Item 23) by hand until the "0" is in the center of the indicating window. Insert the gear and of the crank into the head so that it hangs down and a few inches forward. Insert crank screw and tighten.
Gift Canning
Model 603 can sealer is adjusted at the factory and no further adjustment is necessary. When readjustment is required; such as, when replacing a seaming roller, loosen the seaming roller screw (Item 10) and slide the seaming roller assembly back until the seaming roller nut plate (Item 26) stops against the rocker frame (see Fig. 2). Holding the seaming roller in this position, tighten the seaming roller screw. Use this same procedure for both seaming rollers. Thumb screws (Item 4) and gauge wire set (Item 28) may be discarded. For gift canning, the paragraphs below on Food Canning and Leak Testing do not apply. See Operation paragraph for can sealing procedure.
Food Canning
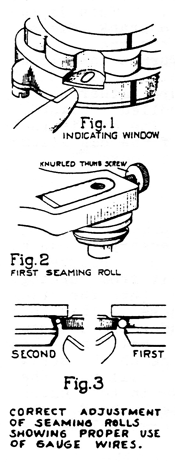
Adjustment of seaming rollers.
Before canning food it is necessary to adjust the seaming rollers. The first seaming roller is on the right side of the sealer (Fig. 2) and is for curling the seam. Turn the crank until "1" appears in the window. Loosen seaming roller screw (Item 10) with the pin and loosen thumb screw (Item 1). Slide the seaming roller back until the seaming roller nut plate (Item 26) stops against the rocker frame (Fig. 2). Remove the pin and retighten the roller screw by hand. Insert the heavy gauge wire between the chuck and the first seaming roller (Fig. 3).
Tighten the thumb screw until a drag is felt on the gauge wire as it is being pulled forward, then tighten the thumb screw an additional 1/4 turn. Tighten the seaming roller screw. Check to see that the gauge wire cannot be pulled out easily. If it can, loosen the roller screw slightly and and tighten the thumb screw slightly. Tighten the seaming roller screw in place and re-check to see that the gauge wire cannot be pulled out easily. If it still can, repeat the above step until it cannot. To remove the gauge wire turn the crank clockwise. After the adjustment is complete and the roller screw is locked in place, tighten the thumb screw.
The second seaming roller is on the left side of the sealer and is for flattening the seam. Turn the crank until "2" appears in the center of the window. The thin gauge wire is used to adjust this seaming roller (Fig.3). Follow the same procedure used for the first seaming roller, except turn the crank counterclockwise to remove the gauge wire.
Leak Testing (Not Necessary for Gift Canning)
Before canning, seal several empty cans until you learn how the sealer works. These empty cans should then be checked for leakage by placing them in a pan of water that has been brought to a boil. After the water has stopped boiling, insert the cans upside down (newly sealed end down) in the hot water. The water should be deep enough to cover about 3/4 of the cans when standing upright. Hold each can with a larger-size filled can from your pantry. The heat will expand the air in the can and within a few minutes a stream of bubbles will be seen coming from a leaky seam. The ends of the cans might "pop" when the can is put into the hot water, but this is normal and should cause no concern.
If a leaky seam is detected, readjust the seaming rollers and repeat the leakage test. Canning should not proceed until the seaming rollers have been adjusted properly and the seams do not produce a stream of bubbles in the leakage test. Repeat the leakage test occasionally when canning.
Operation
Before inserting a can, turn the crank until the "0" is in the center of the indicating window. This is the starting position for all can sealing operations. The turntable lift lever (Item 20) should be in the forward position. The spacer (Item 13) is used only for No. 1o cans (7" high). For No. 12 cans (8-3/4" high) remove the spacer by lifting off the turntable (Item 12) and removing the spacer and reinserting the turntable shaft into the turntable tube (Item 14). With a lid centered on the top of can, center the can on the turntable. Raise can by pushing the turntable lift lever to the left and rear until the lever touches the column (Item 11). This is the locked position and the can is now ready to be sealed. Turn crank clockwise. Do not turn crank counterclockwise. This will seal the can to the chuck. See arrow on crank for crank rotation direction. Turn crank clockwise and note first and second operations taking place automatically as "1" and "2" appear in window respectively. The crank should turn rather hard toward the end of each operation so that the seam will be rolled "tight." Continue turning until "0" reappears in window (20 turns). The can is then sealed. Pull the turntable lever to the forward position. If the can sticks to the chuck, tap the bottom of the can sideways to break it loose.
Removing the Chuck
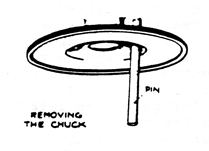
Removing the chuck.
If replacement of the chuck becomes necessary it can removed as shown in Fig. 4. Place the pin through one of the two holes in the chuck, to keep it from turning. While holding the pin in this position, turn the crank counterclockwise until the chuck is loose. Then turn the crank until the "0" is in the window and unscrew the chuck by hand. After unscrewing, hold chuck in hand and strike the threaded end of the chuck screw with the flat side of the hammer. This will pop out the screw out of the chuck.
To replace the chuck, insert screw in the center hole of the chuck, from the hollow side and screw into place by hand. Put the pin through one of the holes as before and turn the crank clockwise until tight. Turn crank until "0" reappears in window.
Lubrication
The numbers in Fig. 5 show the points that require oiling. Use a light machine oil or a 10 or 20 weight motor oil. 3-IN-ONE multi-purpose oil is a good choice. For frequent use, oil several times a year. For occasional use or light use once a year is sufficient. In the instructions below, the numbers refer to the oiling points in Fig. 5.
- Apply oil to hole shown.
- Apply oil to hole shown.
- Pull seaming roller down against spring. Apply oil to space between seaming roller and thrust washer.
- Remove turntable and apply oil to the turntable shaft.
- Remove turntable and top washer of thrust waher. Apply oil to needle bearing.
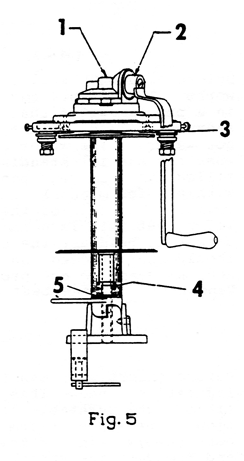
Model 603 can sealer lubrication points.
- Ives-Way Products, Inc.
- PO Box 70
- Round Lake Beach, Illinois 60073
- Phone: (847) 740-0658